Mixed Baby Greens with Maple Dressing, Cranberries and Apples

I only recently discovered how delicious salads, with homemade dressing, can be so was happy to serve one up as a starter for my recent dinner party. The entree, Fish Mollee, was on the heavier side so wanted something light but not boring. I also wanted to sneak some fruit in there as I’ve been lacking in my fruit intake lately. Enter Mixes Baby Greens with Cranberries, Apples, and Goat Cheese with Maple Dressing. It was easy (especially as you can make the dressing earlier and refrigerate until ready to use), quick, and delicious.

The dressing is quite garlicky, be warned, but it actually offsets the sweetness of the cranberries apples, and maple really nicely. By the end of the salad I couldn’t taste the garlic anymore but I am sure that’s just because my whole mouth tasted like it. I’d definitely make this again whether for a party or as a quick weekday dinner.

20120331-110418.jpgMixed Baby Greens with Maple Dressing, Cranberries and Apples

1/4 cup extra virgin olive oil
1 garlic clove, minced
1 1/2 T apple cider vinegar
2 T maple syrup
Kosher salt
2 Granny Smith apples, cored and cut into thin strips
1 T fresh lemon juice
8 cups mixed baby greens, lightly packed
1/2 cup dried cranberries
1/3 cup toasted, chopped pecans or walnuts
3 ounces goat cheese, crumbled

1. Make the maple dressing: Whisk together the oil, garlic, vinegar and maple syrup until well combined. Add kosher salt to taste. (I usually need 3-4 generous pinches, tasting after each addition.)

2. In a medium bowl, toss the apples with the lemon juice to prevent browning.

3. In a large bowl, combine the baby greens, apples, cranberries and half the pecans. Toss the greens with maple dressing to taste and divide among serving dishes. Top each dish with remaining pecans and goat cheese. Serve immediately.

Serves: 4-6

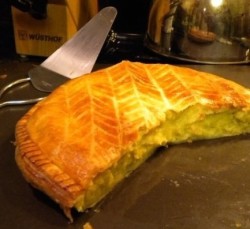
Galette des Rois

One of my favorite memories growing up was celebrating Epiphany with my mother’s side of the family in Paris. Honestly, I couldn’t tell you how we celebrated other than sitting around the table sharing a Galette des Rois. These cakes are sold in every bakery in France leading up to and around the first Sunday of January. Unfortunately they are close to impossible to finding here in Boston so you’ll just have to make your own.

A Galette des Rois is a cake made of flaky puff pastry layers with a dense center of frangipane. The south and north of France have slightly different versions with the south adding candied fruits, so I am sticking to what I know of from living in Paris.

Adapted from Wiki: Tradition holds that the cake is “to draw the kings” to the Epiphany. A figurine, la fève, is hidden in the cake and the person who finds the trinket in their slice becomes king for the day and will have to offer the next cake. Originally, la fève was literally a broad bean (fève), but it was replaced in 1870 by a variety of figurines out of porcelain. A paper crown is included with the cake to crown the “king” who finds the fève in their piece of cake. To ensure a random distribution of the cake shares, it is traditional for the youngest person to place themselves under the table and name the recipient of the share which is indicated by the person in charge of the service.

I chose this recipe from All Recipes and it came out very similar to as I remember. Its a lot of work (especially if you make the almond paste from scratch as I did) but well worth the efforts for the flood of memories.

Galette des Rois

Ingredients
1/4 cup almond paste
1/4 cup white sugar
3 tablespoons unsalted butter, softened
1 egg
1/4 teaspoon vanilla extract
1/4 teaspoon almond extract
2 tablespoons all-purpose flour
1 pinch salt
1 (17.25 ounce) package frozen puff pastry, thawed
1 dry kidney bean
1 egg, beaten
1 tablespoon confectioners’ sugar for dusting

Directions
Place the almond paste into a food processor or blender with about half of the sugar, and process until well blended. Add the butter and remaining sugar using and process until smooth, then blend in 1 egg, vanilla extract, almond extract, flour and salt. Set aside.

Preheat the oven to 425 degrees F (220 degrees C). Butter a baking sheet or line with parchment paper, and set aside.

Roll out one sheet of the puff pastry into an 11 inch square. Keep the pastry cool, do not knead or stretch. Use a large pie plate, cake pan or frying pan to trace an 11 inch circle onto the dough using the tip of a small knife. Place the circle of pastry onto the prepared baking sheet. Repeat with the second sheet of pastry. Refrigerate both sheets.

Mound the almond filling onto the center of the pastry that is on the baking sheet. Leave about 1 1/2 inch margin at the edges. Press the bean or feve down into the filling. Place the second sheet of pastry on top, and press down the edges to seal. Beat the remaining egg with a fork, and lightly brush onto the top of the galette. Use a knife to make a criss cross pattern in the egg wash, and then prick several small slits in the top to vent steam while baking.

Bake for 15 minutes in the preheated oven. Do not open the oven until the time is up, as the pastry will not fully puff. Remove from the oven, and dust with confectioners’ sugar. Return to the oven, and cook for an additional 12 to 15 minutes, or until the top is a deep golden brown. Transfer to a wire rack to cool.

Lay a golden paper crown gently on top of the cake. This will be used to crown the person who finds the bean or feve. Serve warm or cold. Make sure to tell everyone about the bean or feve.

It was probably wise for my grandparents to buy numerous Galettes so that there could be numerous kings.

Praline Topped Brownies

I was making dinner for a friend this past Sunday and wanted, naturally, to include dessert but had a hell of a time trying to decide what to make. I didn’t want something too fussy that I would have to make during the evening as I wanted to enjoy being able to hang out. I didn’t want something common like a chocolate chip cookie as I wanted it to feel a little more special. I didn’t want something bulky or untransportable as I wanted to be able to get rid of the leftovers. Brownies! Yes. But not your everyday run of the mill brownies, they needed to have something special to them. Something to make them feel like dessert and not something you just add to your order at your local coffee shop. I think I got it… Praline Topped Brownies.

I made a note about the frosting below for you but, basically, the frosting will look very different whether or not you have patience. Either is totally fine and equally delicious, it’s just what you prefer esthetically. I think I prefer the cooled version myself although I have little patience when assembling desserts as I just want to eat them as quickly as possible.

The brownie recipe alone was actually really good (I ate three before I even made the frosting – not particularly proud of that). They were very chocolately and chewy and soft in the middle, just the way I like them. We enjoyed one after dinner and, turns out, they make a great mid-morning snack as well. They also transported well so that I could rid of my house of them as not to eat any more.

Praline Topped Brownies20120305-134922.jpg
Adapted from You Made That (modified from Delish.com)

Ingredients:
1 cup butter
4 (1-ounce) squares unsweetened chocolate
1/2 cup semisweet chocolate chips
2 cups sugar
1/4 cups light brown sugar
6 large eggs
2 teaspoons vanilla extract
1/2 teaspoon salt
1 1/4 cups all-purpose flour

Praline Topping
5 tablespoons margarine or butter
1/3 cup packed light brown sugar
1 T vanilla extract + 2 T water
2 cups confectioners’ sugar
1/2 cup pecans, toasted and coarsely chopped

Directions:
Preheat oven to 350 degrees F. Line 13- by 9-inch metal bakingpan with foil; grease or spray foil with cooking spray.

In heavy 2 quart saucepan over low heat, melt margarine or butter and chocolates, stirring frequently. Remove saucepan from heat.

Transfer chocolate mixture to a large bowl and beat in sugars, then eggs, until well blended. Stir in vanilla, salt, then flour just until blended. Gently stir in chocolate chips until just blended. Spread batter evenly in pan.

Bake brownies 35 min. (toothpick inserted in brownies will not come out clean). Cool brownies in pan on wire rack. If not using brownies within 1 day, cover cooled brownies with foil and refrigerate or freeze for longer storage.

20120310-113814.jpgIn 2-quart saucepan over medium-low heat, heat butter and brown sugar, until mixture melts and bubbles, about 5 minutes. Remove saucepan from heat. With wire whisk, beat in vanilla and water, then confectioners’ sugar, until mixture is smooth.

*Side Note: You Have two options here, both equally delicious. Option 1) Glaze your brownies as the frosting is still warm and let it drip down the sides or Option 2) Wait, somewhat patiently, for your frosting to cool to room temperature and then frost your brownies creating more of a traditional cake look / feel. Personally, I did one (I impatiently wanted one stat) and the the other which I think is the way to go.

With metal spatula, spread frosting on cooled brownies; sprinkle with pecans. To cut brownies lift the foil out of pan and cut even squares.

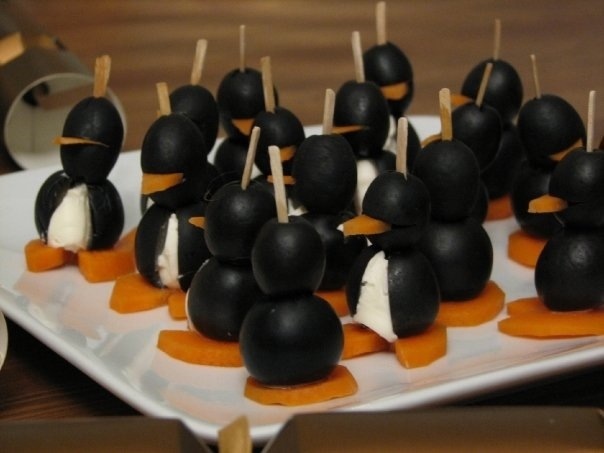
Cream Cheese Penguins

I’ve found that there isn’t anything that will wow a crowd like food shaped into cute little animals. Most aren’t appropriate for cocktail parties (“Here’s your Hello Kitty cake pop, Mr. CEO”), but I have found one that is black tie friendly, if you know what I mean.

This particular hors d’oeuvres is not only completely adorable but also very easy to assemble. I promise you’ll get lots of comments on these little guys.

Cream Cheese Penguins

Ingredients:
18 jumbo black olives, pitted
1 (8 ounce) package cream cheese, softened
18 small black olives
1 carrot

Directions:
Cut a slit from top to bottom, lengthwise, into the side of each jumbo olive. Carefully insert about 1 teaspoon of cream cheese into each olive. Slice the carrot into eighteen 1/4 inch thick rounds; cut a small notch out of each carrot slice to form feet. Save the cut out piece and press into center of small olive to form the beak. If necessary cut a small slit into each olive before inserting the beak.
Set a big olive, large hole side down, onto a carrot slice. Then, set a small olive onto the large olive, adjusting so that the beak, cream cheese chest and notch in the carrot slice line up. Secure with a toothpick.

20120226-102433.jpg
My army of penguins are ready to go when you are.

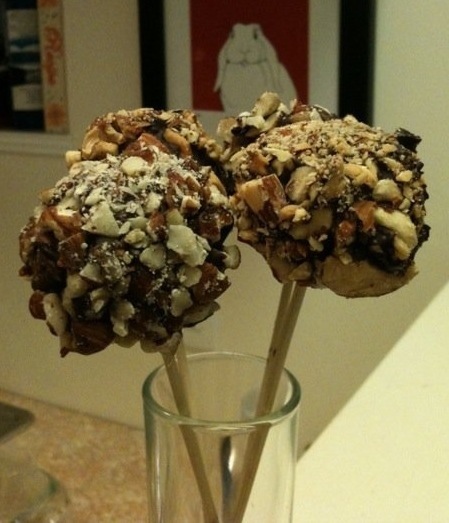
Cheesecake Pops

Last year Cake Pops took the world by storm! This was a bandwagon I had to get on.

I had just made a cheesecake that barely had a dent in it when I was invited to a dinner party so thought this was the perfect opportunity to try these cute little pops out.They are easy to make and look really impressive (to make it even easier, just buy a pre-made cheesecake at your grocery store). You can serve them in little narrow short containers, like shot glasses, or upside down in pretty cupcake liners, which is a lot easier for transporting. You can also be your own chef here by dipping and rolling them into the toppings of your choice. White chocolate with chopped pistachios and dried cranberries, dark chocolate with candied ginger, milk chocolate with sprinkles – the possibilities are endless (and delicious)!

20120304-094643.jpgCheesecake Pops

I used leftover cheesecake from this recipe but you can use any recipe or even buy a pre-made cheesecake at your local grocer.

Instructions:
Scoop, avoiding the crust, out balls of cheesecake with an ice cream scoop. Roll out little balls using your hands, about 1 & 1/2 inches round. Insert a popsicle stick into each ball about 3/4 of an inch in (hallway). Freeze until frozen, about 2 hours.

Once cake pops are ready, melt 1 lb semi-sweet chocolate chips with 2 tbsp vegetable shorting in a double boiler over low heat. Remove pops from the freezer and dip them, holding the stick, in the chocolate to cover the entire pop. Gently tap the stick on the edge of the bowl to shake off excess chocolate. Immediately roll chocolate covered pop in crushed nuts (I used almonds and walnuts).

I used an upside down colander to dry my pops (put the sticks in the little holes) but you can dry them in an upright, short, narrow container or even laying down if you don’t have anything (not ideal as then they get a flat side).

These always go quickly at parties so make sure to make plenty!

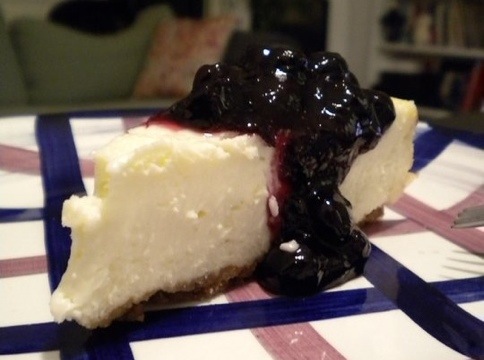
Cheesecake with Blueberry Sauce

There are fluffy-cheesecake people and dense-cheesecake people. Then there are people like me who like any and all cheesecakes. Fluffy, dense, light, heavy, ricotta, cream cheese, plain, flavored. Bring it.

My brother, Jeremy, is actually the cheesecake master in our family. About 8 years ago he flew in from Tokyo, where he lives, to Sonoma, where my dad was currently living (we bounce around a bit), where we met up for Christmas. He made a cheesecake that, to this day, my dad still raves about. Anytime I even mention cheesecake my dad immediately references this amazing cheesecake that was made years and years ago. I think my brother had it right by making one stellar cake to leave us all craving more. So, like much of my childhood, here I am trying to imitate my big brother.

This is a very dense, New York style cheesecake. Hope you like it as much as I did!

20120304-092853.jpg

Cheesecake
From Seasons and Suppers
Adapted from ”New York Cookbook,” by Molly O’Neill via the New York Times

1/4 – 1/2 cup graham cracker crumbs
3/4 cup plus 2 tablespoons sugar
3 tablespoons sifted cornstarch
30 ounces (3 3/4 large packages) cream cheese, softened
1 large egg
1/2 cup heavy (35% whipping) cream
3/4 teaspoon vanilla extract

Blueberry Sauce:
1 1/2 cups blueberries (wild, if you can find them)
1/3 cup white granulated sugar
1 Tbsp. cornstarch
1/2 cup water

Pre-heat your oven to 350° F. Butter the bottom and sides on an 8-inch spring form pan.

You can use a 10-inch but the cake will be thinner. Take the graham cracker crumbs and sprinkle evenly over the bottom of the pan, just so it covers the bottom of the pan without any bare spots. Place the pan in the fridge.

In a large bowl (or bowl of stand mixer), whisk together the sugar and the cornstarch. Beat in the cream cheese and then the egg. Slowly add in the heavy cream, beating constantly. Add the vanilla and mix well.

Remove pan with cracker crumbs from the fridge. Pour this mixture into the prepared pan. Bake in the preheated 350° F. oven until the top is golden, about 40 to 45 minutes. Cool in the pan on a wire rack for 3 hours at room temperature, then refrigerate, 4 hours or more.

Prepare Blueberry Sauce: Combine sugar and cornstarch in small saucepan. Take 1/2 cup of the blueberries and crush with a fork. Add to the saucepan with 1/2 cup of water. Stir. Bring to a boil and cook until sauce is thickened and translucent. Remove from heat and add remaining 1 cup of blueberries. Allow to cool at room temperature.

Serve cheesecake drizzled with blueberry sauce.

Looking for something to do with your leftover cheesecake? Try these Cheesecake Pops!

Nutella Mousse

I made this mousse a few days ago when an old friend was in town visiting. It was a nice light finish to our roast beef and leek and potato puree dinner. I love this recipe as you have to make it in advance. Its also is, obviously, served chilled so you don’t have to spend any time fussing in the kitchen when you should be enjoying yourself with your guests. The mousse was really light and fluffy and not overly nutella-y (although that’s never a bad thing). The oreo crunch at the bottom gave it nice texture as well. Definitely an easy recipe I’ll be keeping on file to make again and again.

Nutella Mousse
Adapted from Wishful Chef

2 Oreo cookies, without cream center
1/8 cup slivered almonds
1/4 cup Nutella
1/2 cup cream, whipped
ground cookies and almonds for garnish

Grind slivered almonds in a food processor until almost like powder and reserve. Do the same for the chocolate cookies. Place cookie crumbs on the bottom of 2 small glasses or bowls. Save a little extra of the ground almonds and cookies for garnish at the end. In a small bowl, whip the cream until you get soft peaks. Mix both the ground almonds and Nutella, then whip the whipped cream and almond Nutella mixture together until smooth and well blended. Place mixture on top of cookie crumbs and sprinkle some crumbs on top. Chill in fridge until ready to eat.

Total Time: 20 minutes
Yield: 2 servings

Mustard Horseradish Sauce

One of the things I was most excited about when I made a Roast Tenderloin of Beef was leftovers to make sandwiches with. I loaded up on arugula, cheddar cheese, and topped it all off with mustard horseradish sauce on wheat bread. The mustard horseradish sauce was really easy to make and was so good (especially with homemade mayo to start it off with). That was a week of delicious lunches to look forward to! What else could I have this sauce with? Hmm….

Mustard Horseradish Sauce
From Ina Garten

3/4 cup good mayonnaise
1 1/2 tablespoons Dijon mustard
1 tablespoon whole-grain mustard
1/2 tablespoon prepared horseradish
2 tablespoons sour cream
Kosher salt

Whisk together the mayonnaise, mustards, horseradish, sour cream, and a pinch of salt in a small bowl. Serve at room temperature.

Roast Tenderloin of Beef

I had never made a roast beef before but with an old friend in town visiting I wanted to try something new. I was so pleased with the week’s worth of chicken sandwiches that I was able to make out of leftover roasted chicken that I wanted to do something similar. I wanted to make something that would give me a week’s worth of lunches.

The recipe I used, below, called for “1 whole beef tenderloin” which is a little vague so I headed to Whole Foods and let them know what I needed. They didn’t have any beef tenderloin behind the glass but they said they had some in the back and would be happy to trim one up for me. They were very helpful and asked all sorts of questions about my dish so that they would best help me.  I explained that I have never made a roast beef before and wanted to feed about 6 people (between dinner and leftovers for sandwiches) so trusted them to cut what they thought was the right size. A few minutes later they came out with this huge slab of meat. Ok, sure, whatever you guys say. I glanced at the price and saw $29.99 which was fine as it would feed me for a week. When I got to check out I quickly learnt that the beef was $29.99 per pound and that giant slab of meat was almost five pounds! Yes, that’s about $150.When they rang that up I almost fainted. Although I was mortified for being so ignorant about the price I asked them to take it back and popped across the street to Trader Joe’s and got about 2 pounds of it for about $14. Score.

The roast beef came out really nicely and was very simple to make, as you can see. I served the roast beef with a side of Leek and Potato Puree which went really nicely with it. With the leftovers, I sliced the roast beef as thin as I could and made sandwiches with arugula, cheddar cheese, and mustard horseradish sauce on wheat bread – now there is a bagged lunch to look forward to! Do you guys have any any good suggestions for leftover roast beef leftover?

20120312-201802.jpgRoast Tenderloin of Beef
From Marcia’s Kitchen

1 whole beef tenderloin, trimmed of fat
1/2 cup olive oil
1 T balsamic vinegar
1/4 cup chopped fresh parsley
several sprigs of fresh thyme
1 bay leaf
2-3 cloves of garlic- mashed- you don’t have to peel
kosher salt and fresh ground black pepper
2 T unsalted butter- room temp

Combine the olive oil, vinegar,parsley,thyme, bay leaf, and garlic in a glass dish large enough to hold the beef- with some space around the roast. Rub the beef all over with the mixture and marinate for at least an hour- if longer than an hour refrigerate it. (Remember to remove it from the fridge about an hour before roasting)

Preheat oven to 450 degrees. Remove the meat from the marinade and pat dry. Place it in a shallow roasting pan and rub the butter all over- top, bottom and sides.

Roast for 20 minutes. Check with a meat thermometer- in at least 2 places- when it’s 120 degrees it’s medium rare. The temp goes up fast so if you need to return it to the oven check every few minutes- this is one expensive cut of meat that you don’t want to over-cook.

Let the meat rest for 5-10 minutes before slicing into thick- about 1/2” slices- serve with the sauce of your choice. I added a splash of wine and cooked down the juices and finished it with a little butter which turned out great. Bearnaise or Bordelaise would work well too!

Leek and Potato Purée

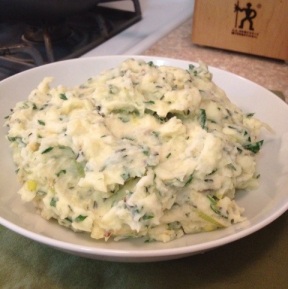
I came across this recipe while looking for a side dish to serve with roast beef. It was a nice alternative to plain ol’ mashed potatoes but not too much so that the roast beef was no longer the star of the dish. These potatoes were creamy, rich, and flavorful – I’ll definitely be making them again, especially with red meat. Delicious!

Leek and Potato Puree20120311-183454.jpg
From Eat Live Travel Write

1/2 cup (125 mL) butter
1 leek, white and light green part, thinly sliced
1/2 cup (125 mL) chopped fresh parsley
1/4 tsp (1 mL) salt
1 1/4 lb (625 g) Yukon Gold potatoes, peeled and chopped
2 tsp (10 mL) chopped fresh thyme leaves
1/2 cup (125 mL) 35% whipping cream, heated

Leek and Potato Puree: In nonstick skillet heat 1 tbsp (15 mL) of the butter over medium heat and cook leeks for about 10 minutes or until soft and golden. Stir in parsley and salt; set aside. Bring potatoes and thyme to boil in large pot of salted water for about 20 minutes or until tender. Drain well and mash until smooth. Add cream and remaining butter and stir until smooth and creamy. Add leek and parsley mixture into potatoes and stir to combine well. Set aside and keep warm.